Filter Hooks

It’s possible to modify or extend the default behavior of HTML Forms beyond what is possible with the available settings. To achieve this, you can use any of the available action hooks and filter hooks in the plugin.

To learn more about what filter hooks are, please refer to the WordPress plugin API documentation.

Available Filter Hooks

Below is a list of all available filter hooks in the plugin.

hf_form_element_action_attr

Filters the action attribute for the form element.

Default value: null

hf_form_element_class_attr

Filters the CSS classes which are added to the form element’s class attribute.

Default value: ""

hf_form_html

Filters the complete form HTML when the form is outputted.

hf_validate_form

Filters the error code when a form is validated. Return an empty string if the form validates without errors.

Default value: ""

Conditional Elements

Conditional elements are supported in HTML Forms by using two special attributes: data-show-if and data-hide-if.

Using these attributes allows you to hide or show parts of your form by referencing the name attribute of a field in your form.

For example, you could choose to only show the submit button after the email field is filled.

<input type="email" name="EMAIL" required />
<input type="submit" value="Send" data-show-if="EMAIL" />

Let’s do another example where you have a help text is hidden after someone starts typing in the field it describes.

<input type="text" name="NAME" />
<p data-hide-if="NAME">Enter your name in the field above.</p>

Specifying an Exact Value

The examples above will show or hide an element whenever the field that it is depending on contains any value, regardless of the actual value.

Sometimes you want to depend on an exact value though. This can be done by following the field name with a colon and the value you need, like this: NAME:VALUE.

Let’s build a form with a list of checkboxes, where a message shows up only when one particular choice is selected.

<input type="checkbox" name="JOB" value="Marketeer" /> Marketeer
<input type="checkbox" name="JOB" value="Developer" /> Developer
<input type="checkbox" name="JOB" value="Recruiter" /> Recruiter

<div data-show-if="JOB:Recruiter">
    Hi, recruiter!
</div>

Specifying Multiple Values

Continuing with the above example, what if you wanted to show part of your form for both developers and marketeers?

You can specify multiple expected values by separating them with a |.

<input type="checkbox" name="JOB" value="Marketeer" /> Marketeer
<input type="checkbox" name="JOB" value="Developer" /> Developer
<input type="checkbox" name="JOB" value="Recruiter" /> Recruiter

<div data-show-if="JOB:Marketeer|Developer">
    Hi, marketeer or developer!
</div>

JavaScript Events

HTML Forms fires several JavaScript events when visitors interact with a form on your site. You can hook into these events to run your own code, for example to send events to Google Analytics.

Available Events

The following events are available:

submit

Fires right after the form is submitted, but before the request is processed.

submitted

Fires after the request is processed, for both successful submissions and errors.

error

Fires after the request is processed when a validation error occurs, for example, when a required field is missing.

success

Fires after the request is processed, and the submission was a success.

Hooking Into an Event

The following code example hooks into the “success” event for all forms (see above).

<script>
html_forms.on('success', function(formElement) {
   // your code goes here
});
</script>

Alternatively, you can hook into a specific form using the default browser events API too.

<script>
document.querySelector('.hf-form-5').on('hf-success', function(e) {
   // your code goes here
});
</script>

You can add this code directly to your form mark-up or to any other JavaScript file that is loaded on your site.

Custom Form Validation

HTML Forms will perform the following form validation by itself:

  • All input fields marked as required should have a non-empty value.
  • All fields of type “email” should have a value that looks like an email address, or no value at all (if not required).

If you want to perform additional form validation, then you can do so by hooking into the hf_validate_form filter hook.

The following example will only accept the form submission if the field named “BEST_VEGETABLE” is filled and the value “carrot” is submitted.

add_filter( 'hf_validate_form', function( $error_code, $form, $data ) {
	if( ! isset($data['BEST_VEGETABLE']) || $data['BEST_VEGETABLE'] !== 'carrot' ) {
		$error_code = 'wrong_answer'; 
	}

	return $error_code;
}, 10, 3 );

Showing a Custom Error Message

The $error_code indicates what message should be shown to the person filling out the form. Since we did not register a message with that error code, the plugin will default to showing the general error message instead.

Let’s improve upon this by showing a more detailed error message describing exactly why the form validation failed.

add_filter( 'hf_form_message_wrong_answer', function( $message ) {
    return 'Sorry, but the best vegetable is a carrot!';
});

Action Hooks

It’s possible to modify or extend the default behavior of HTML Forms beyond what is possible with the available settings. To achieve this, you can use any of the available action hooks and filter hooks in the plugin.

To learn more about what action hooks are, please refer to the WordPress plugin API documentation.

Available Action Hooks

Below is a list of all available action hooks in the plugin.

hf_form_success

Runs when a form is submitted successfully, after the submission was saved.

Parameters: $submission$form

hf_form_error

Runs when a form is submitted but a validation error occurs.

Parameters: $error_code$form$data

Sending E-mail Notifications

You can configure HTML Forms to send out an email notification whenever a form is successfully submitted.

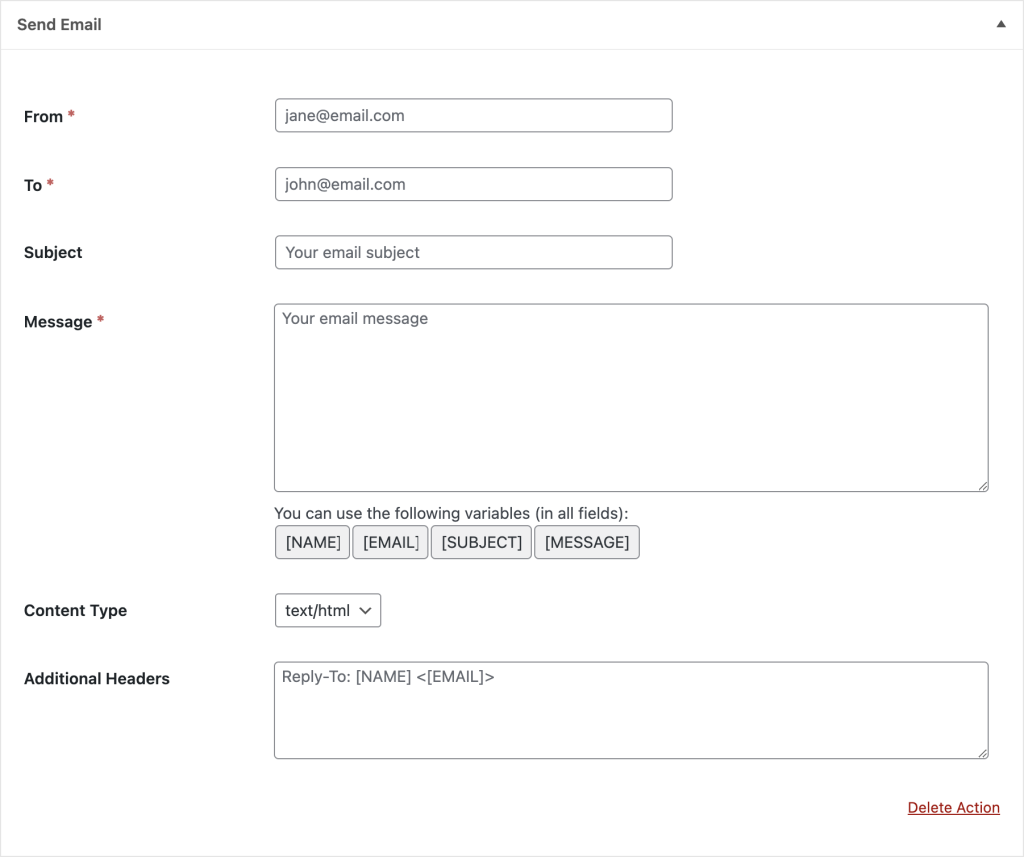
To set this up, edit your form and open up the Actions tab. Near the bottom of the page should be a heading titled Add Form Action with a Send Email button.

Clicking that Send Email button will add a settings block to the page that should look like this:

Send Email action found in the HTML Forms WordPress plugin.

Settings

Here’s what each setting does.

From

Define the email address you wish the message to come from. This field accepts field value placeholders.

It is advised to pick an address with the same domain name as your website to prevent ending up in someone’s SPAM folder. For example, if your website is flowers.com, then lee@flowers.com is better than leeflowers@gmail.com.

Also note that if you use a third-party email senders on your WordPress site that the address in this field must be validated with that service.

To

The email address that the email should be sent to. This field also accepts field value placeholders.

Subject

The subject of your email message. This field also accepts field value placeholders.

Message

The actual message body of the email. This field also accepts field value placeholders.

Content Type

You can decide if your email is HTML or plain text.

Additional Headers

You can include custom headers with your email. We recommend, if you want to define a Reply-To address, you use this setting with placeholders.

Redirect to URL After Successful Sign-Ups

You can configure HTML Forms to redirect to a certain page on your website after each successful form submission. An example use case would be to send visitors to a “Thank You” page after they submit your form.

To set this up, open up your form, navigate to the Settings tab and locate the setting for a redirect:

Redirect to URL feature found in the HTML Forms WordPress plugin.

Make sure to use complete (absolute) URL’s and to redirect to a page that describes that the form was processed successfully. You don’t want to confuse your visitors with a random redirect.

Template Variables

HTML Forms provides several template variables you can use in your form content. These form variables will be dynamically replaced when the form is shown. Currently, you can use the following variables.

user

Will be replaced with the specified property of the currently logged-in user.

{{ user.user_email }}

url_params

This will be replaced with a parameter from the page URL, or with an empty string if the specified URL parameter does not exist.

{{url_params.utm_source}}

post

This will be substituted with the specified property of the post that is viewed on the page the form is displayed on.

{{post.ID}}

Hide Form After a Successful Sign-Up

Hiding a form after it was successfully submitted is easy with HTML Forms.

Open up your form, navigate to the Settings tab and toggle the setting shown below to Yes.

Hide form feature found in the HTML Forms WordPress plugin.

This will hide your form fields after the form is submitted without errors. The success message you enter will still show, regardless of the setting.

Installing the HTML Forms Premium Add-on

You’ll need to install and activate HTML Forms Premium before you can start using it on your WordPress website. This is a step-by-step guide for anyone who has never installed a premium plugin before. If you still are having issues after reading this guide, please contact us via our support form for more assistance.

Step #1: Download HTML Forms Premium

You should have received an email after completing your HTML Forms Premium purchase. The subject of the email is “HTML Forms Premium – Purchase Receipt.” In that email is a link to download HTML Forms Premium to your computer.

If you didn’t receive that email for some reason, please check your spam box in your email client. Alternatively, you can download the file directly from the Account area of this website using the login information that was created for you after your purchase.

Click on the link to download the file and save it somewhere on your computer you will remember. We suggest saving the file to your desktop for easy access in the next step.

Step #2: Upload & Install HTML Forms Premium

You will need to upload the HTML Forms Premium file, that you just saved to your computer, to your WordPress site manually. This is a very simple process that you can do with just a few clicks.

First, log in to your WordPress admin and find the Plugins menu on the left-hand side. Click on the menu option called Add New. It should look something like this:

Add New Plugin Screenshot

The next screen can be overwhelming, but we are only concerned with one part. At the top is a button that says Upload Plugin. Pressing that button will give you the option to upload the HTML Forms Premium file that you saved on your computer to the server.

Upload Plugin Screenshot

Press Choose File, find the HTML Forms Premium file (if you followed our advice above, it should be on your desktop), and then press the Install Now button. You will be taken to a new screen with one last button to click. Press the Activate Plugin button.

Activate Plugin Screenshot

If everything went smoothly, you should be back on the Installed Plugins screen. We’re one last step away from finishing the process of installing HTML Forms Premium.

Step #3: Activate Your License Key

Your purchase receipt email contained a License Key. You’ll need this to complete the installation process and get HTML Forms Premium working on your site.

Find the HTML Forms choice on the left-hand side menu in WordPress. There you will find an option to open up HTML Forms’ Settings. Next, go to the HTML Forms Premium License section, put your License Key in the field marked License Key and then press the Save License Key button. Finally, press the Activate button to complete the process.

Now that HTML Forms Premium is active, all premium features are instantly unlocked.

Did you purchase a license for HTML Forms Premium before December 2024?
You can follow the instructions below to download and activate HTML Forms Premium.

Let’s walk through how to install the HTML Forms Premium add-on. After registering your account and processing your payment, you immediately have access to the HTML Forms account area.

Download HTML Forms Premium

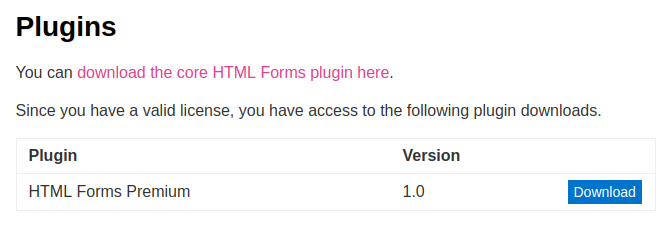
After logging in to your account, head on over to the plugins page.

The Plugins screen of the HTML Forms Premium account area.

Click the Download button to download the latest version of HTML Forms Premium.

Note for Safari for Mac users for which the .zip file automatically extracts after downloading, either go to Preferences > General and uncheck “Open safe files after downloading” or simply re-compress the files to a .zip again.

Installing & Activating HTML Forms Premium

Log in to your WordPress admin panel, go to Plugins > Add New and locate the Upload Plugin link.

The WordPress admin interface for uploading a plugin via Zip file.

Browse to the location where the downloaded plugin package is located on your computer and select it. WordPress will automatically upload the plugin to your server. After that is done, you can safely click the Activate link to activate the plugin.

Now that HTML Forms Premium is active, all premium features are instantly unlocked.