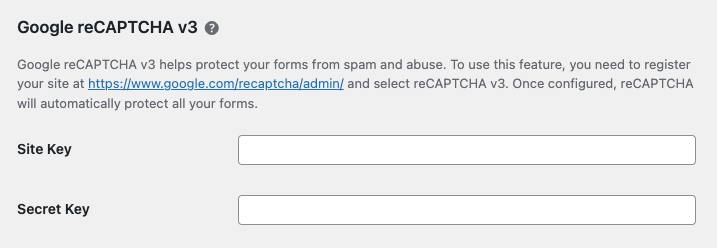
Dashboard Widget

HTML Forms Premium automatically adds an easy to reference widget to the WordPress dashboard. This dashboard widget lists your active forms, shows how many submissions are unread, and the total number of submissions.

Screenshot of HTML Forms Premium Dashboard Widget

The dashboard widget is enabled by default. You, or your other admin users, can hide it manually if they choose by using the built-in Screen Options feature on the WordPress dashboard.

Require Users to Log In

HTML Forms Premium includes a visibility feature that lets you only show a form when a user is logged in to your site. This feature lets you have greater control over who can see, and submit data, to your website.

Enabling the Require Users to Log In Feature

You’ll need to install HTML Forms Premium to begin. With that done, head over to the Settings tab of the form you wish to enable this feature on. Find the Require Users to Log In field and select the “Yes” option.

Screenshot of HTML Forms Premium Require Users to Log In Setting

It’s that simple. Head to the Messages tab if you’d like to define the text that is shown to users who are not logged in. Find the User Log In Required field and put in whatever text you want to display.

Submission Notifications

HTML Forms Premium includes a feature to provide you with form submission notifications inside the WordPress admin. The notifications show you how many unread, or unseen, submissions you have. These notifications appear in the admin’s menu, on the HTML Forms list, and on each form’s Submissions tab.

How Submission Notifications Appear

WordPress Admin Menu

A counter, displaying the number of unread submissions, appears in the WordPress admin menu next to the HTML Forms link.

Screenshot of HTML Forms Premium Submission Notifications in the WordPress Admin Menu

HTML Forms List

On the main list of forms, inside the HTML Forms plugin, a notification badge with the number of unread submissions appears like so:

Notifications feature found in the HTML Forms Premium add-on.

Submissions Tab

On each form, the Submissions tab changes to show you which submissions have not been viewed. The background of each submission’s row is highlighted. An optional “Mark as seen” link is provided to quickly change the submission’s status. Finally, you can use the Bulk Actions menu to quickly mark multiple submissions as seen. Clicking on any individual submission, to view its details, will also mark it as seen.

Screenshot of HTML Forms Premium Submission Notifications in the Submissions Tab of a Form

How to Enable Notifications

First, install HTML Forms Premium. Once that’s done, you can turn on submission notifications on a form-by-form basis. Simply go to the Settings tab of your form and find the Enable Notifications field. Select “Yes” to turn on the submission notification features for this particular form.

Screenshot of HTML Forms Premium Enable Notifications Setting

Webhooks

HTML Forms Premium adds an action to let you connect your form data to an external service using a webhook. This feature helps unlock the base plugin in an incredible number of ways. You can send data from your visitors to third-party applications or your own internal software tools.

How to Create a Webhook Action

First, you’ll have to install HTML Forms Premium. Once that is complete, you’ll find a new button on the Actions tab of your form called Trigger Webhook. Pressing that button will reveal the window to build the webhook connection to your form.

Screenshot of HTML Forms Premium Webhook Action

As you can see in the screenshot, there are three fields in the webhook action.

Webhook URL

This is the destination URL that your form data will be sent to.

Content Type

Define what type of content will be sent to the webhook URL. Your choices are JSON or encoded form data.

Additional Headers

If your Webhook URL requires additional headers, like authorization, you can include that information here.

Sending Data to the Webhook

All data included in the form is sent to the webhook whenever this is a successful submission. It is sent in the format you chose in the Content Type field, to the address in your Webhook URL field, with any headers you included in Additional Headers. It is the responsibility of the service running at the Webhook URL to handle things from there.

Submission Limit

HTML Forms Premium includes a setting, for each form, that lets you define a Submission Limit. This can be found in the Settings tab of your form. By placing a value in the field, you can define how many submissions your form is allowed to accept.

Set a submission limit to control how many times a form can be processed.

Your form will no longer load when the number of submissions meets the Submission Limit. The message that displays when this situation occurs can be set in the Messages tab. Find the field called Submission Limit Reached and enter in the text you want to show users who visit a form that has met its limit.

Export Submissions

HTML Forms Premium adds the ability to export your form submissions to a spreadsheet file on your computer. This is an excellent way to pull data from your site for backup or to send to others. This feature includes a simple feature to offer additional control over the export file format.

How to Export Submissions for a Form

Once you have installed HTML Forms Premium, the Submissions tab on your forms will automatically include a button labeled Export Submissions. Pushing this button will trigger a download of a spreadsheet file containing every submission for that form.

Settings for Export Submissions

Unfortunately, not all spreadsheet programs are created equally. Certain programs open up files expecting different delimiters between data. A delimiter helps determine how data is organized into columns. The HTML Forms Settings screen, with Premium installed, will allow you to set the Export Delimiter of the file with one of four choices: a comma, a semicolon, a tab, or a vertical bar.

Screenshot of HTML Forms Premium Export Delimiter Setting for File Uploads

File Uploads

HTML Forms Premium adds a File Upload field to the base plugin. You can use this field to let users include files with their form submissions. You won’t have to write any of your own file uploading or processing code. HTML Forms Premium will handle all of that for you.

File Upload Field

Once you have installed HTML Forms Premium, the File Upload field will be included in the Fields tab of your forms. This new field asks you to provide a Field Label, a list of Associated File Types, and whether the field is required to submit the form.

Screenshot of the File Upload field in HTML Forms Premium

Pressing the Add Field to Form button will automatically insert the necessary HTML into your form. The actual processing of the file, as mentioned above, will happen automatically. Of course, you can modify some of that processing. Let’s discuss that next.

Settings for File Uploads

On the main Settings screen, for HTML Forms, will be an additional area for File Uploads when HTML Forms Premium is active. There are three different settings you can adjust to modify how file uploads are processed and presented.

Direct Links

You can control how file uploads are linked in your Submissions tab and e-mail notifications. Select Yes to turn on direct links to actual files. Select No to have your file uploads link to the WordPress Media Library.

Screenshot of HTML Forms Premium Direct Links Setting for File Uploads

Media Library Uploads

HTML Forms Premium will let you decide if file uploads are included in the WordPress Media Library. Select Yes to always include uploaded files in the Media Library. Select No to disable this feature. The No option will make all links direct, regardless of your Direct Links setting.

Screenshot of HTML Forms Premium Media Library Uploads Setting for File Uploads

Maximum File Size

The third setting for File Uploads lets you control the maximum file size of any upload. Leave the setting empty, or place a 0, to let files of any size be uploaded. Set a value, measured in bytes, to set a specific maximum file size to apply to all of your File Upload fields on all forms.

Screenshot of HTML Forms Premium Maximum File Size Setting for File Uploads

Tracking Form Submissions with Google Tag Manager, Google Analytics, and Google Ads

Roman Grigorian has written a great step-by-step guide on how to use the HTML Forms plugin with Google Tag Manager, Google Analytics, and Google Ads to track submissions:

https://romangr.com/blog/gtm-html-forms

Form Submissions

HTML Forms will store all of your form submissions directly inside the WordPress admin. You can access this from the Submissions tab when viewing a form.

List View

The Submissions tab shows all the submissions your form has received in chronological order. Each field in your form will have its own column, in addition to a Timestamp column showing the date and time when the submission was saved.

Form submissions viewable inside the WordPress admin when using the HTML Forms for WordPress plugin.

You can delete submissions by checking the box in the corresponding row and selecting Delete Permanently from the Bulk Actions drop. Finally, if you want to hide individual columns, you can do so by using the Screen Options interface available at the top of the screen.

Detail View

From the List View, clicking on a submission’s Timestamp will take you to the Detail View. This is where you can all the field data from the submission. That includes default data stored with every submission (User Agent, IP Address, and Referrer URL).

Disabling Form Submission Saving

Not interested in storing submission data for a form? You can turn off saving submissions in the form’s settings.

Add Users to a Mailchimp List

You can set up HTML Forms to add email addresses to a designated Mailchimp list whenever a form is successfully submitted.

You will have to install and configure the MC4WP plugin in advance for this feature to work. Once MC4WP is running, edit your form and open up the Actions tab. Near the bottom of the page you will find a section called Add Form Action with a Mailchimp button.

Clicking that Mailchimp button will add a settings block to the page that should look like this:

Mailchimp action found in the HTML Forms WordPress plugin.

All you need to do is select which Mailchimp list you want to use. Then save your form. The next time a user submits the form, and one of the fields contains a valid email address, that address will be added to your Mailchimp list.